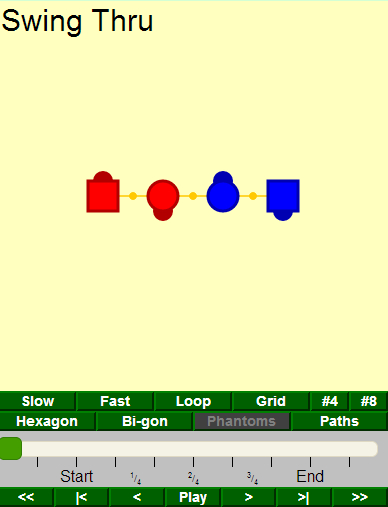
How to use Taminations
This example to the right is just a snapshot image, not a working
animation. The square dancers are boys, and the round ones are
girls. The orange connections are handholds.
I try to follow the Callerlab definitions as closely as possible.
Some differences you might see are:
-
The dancers may adjust a bit to finish in standard lines, waves,
columns, etc. This is what real dancers do as well.
-
I try to match the Callerlab timing with the number of tick
marks between Start and End, but you might find a few
differences. Calls with parts are labeled after Start as
Part 2 - 3 etc, other calls that can be fractionalized
are labeled with fractions.
-
Handholds are drawn very simply and don't show any styling -
hands up, couples, forearm, are all shown the same. Some
handholds might not start or end exactly when real dancers
would.
I have added ratings to some of the calls,
♦ for common usage,
♦♦ for less common,
and ♦♦♦ for the most difficult.
The ♦ calls are the ones
Callerlab has identified as
Standard Applications.
The others are just my own subjective opinions, based on my
experience on calls that are used most often and
calls that give dancers the most difficulty.
Tamination Controls and Display
-
Square dancers are "boys", circles are
"girls". The dark hemisphere show the facing
direction. So this example shows right-handed ocean waves with girls in the center.
Click on a dancer to show a line for its path.
-
These orange connectors are handholds. There's no styling -
hands up, couples, forearm etc. are all drawn the same.
- Slow
Dancers move at a Slow pace.
- Fast
Dancers move at a Fast pace.
- Loop
Repeats the animation continuously.
- Grid
Shows a grid with 1-dancer-size boxes.
- #4
Numbers couples 1 to 4
- #8
Numbers dancers 1 to 8
- Hexagon
One dancer is added for every 2 in the starting formation, so 4
couples becomes 6 couples. There's an
excellent article
on this by Clark Baker, and
more info and graphics
by Justin Legakis
-
Bi-gon
This variation removes half the dancers, so 4 couples becomes 2.
A great article by Sue Curtis
is required reading if you want to
attempt to understand this.
- Phantoms
Some Challenge calls have phantoms dancers. For those, you can use the Phantom
button to show them.
- Paths
Displays the route dancers take as colored lines.
This is the same as clicking on each dancer.
- This slider shows the current position in the animation. You can
drag it to change the position. You can also use the mouse wheel.
-
Multi-part calls have the different parts numbered here. The
tick marks show the beats. All animations start on the second tic mark.
- << Click to go to the start of the animation.
- |< Click to go to the start of the current part.
- < Click to go backward a small amount.
- Play Click to play or stop animation.
- > Click to go forward a small amount.
- >| Click to go to the start of the next part.
- >> Click to go to the end of the animation.
Special Features
Click on a dancer for these extra features.
- Click: Show Path
- Alt-Click: Show Path with Bezier control points
-
Shift-Click: Barstool
This fixes the position of one dancer. The barstool dancer can
turn but not move. All the other dancers adjust by moving around
the barstool. Clark Baker has a
good explanation.
-
Control-Click: Compass
The complement to barstool - one dancer's facing direction is
fixed but can still move forwards, backwards, and sideways.
The other dancers have to rotate the setup to adjust.
I don't know if this has actually been done, it might not be
practical especially for 4 couples.
|
This is a static image of an animation. Move over each item to highlight what it does.
|